<body><script type="text/javascript"> function setAttributeOnload(object, attribute, val) { if(window.addEventListener) { window.addEventListener('load', function(){ object[attribute] = val; }, false); } else { window.attachEvent('onload', function(){ object[attribute] = val; }); } } </script> <div id="navbar-iframe-container"></div> <script type="text/javascript" src="https://apis.google.com/js/platform.js"></script> <script type="text/javascript"> gapi.load("gapi.iframes:gapi.iframes.style.bubble", function() { if (gapi.iframes && gapi.iframes.getContext) { gapi.iframes.getContext().openChild({ url: 'https://www.blogger.com/navbar/6154817622702903944?origin\x3dhttp://vincent1303.blogspot.com', where: document.getElementById("navbar-iframe-container"), id: "navbar-iframe", messageHandlersFilter: gapi.iframes.CROSS_ORIGIN_IFRAMES_FILTER, messageHandlers: { 'blogger-ping': function() {} } }); } }); </script>

夢的機器。簡易檔案偽裝圖檔教學

2009年4月29日 星期三 by ○。o傻〃仔〃仔o。


不時有人會問我說『如何把壓縮檔放進圖片裡?』,簡單來說就是檔案偽裝,這樣的功能其實用簡單的命令提示字元就可以完成,範例如下:

copy /b 原圖檔.jpg+壓縮檔.rar 偽後裝的圖檔.jpg

不過對我來說下command還是麻煩了一些,因此我都選擇一些輔助性的軟體,一直以來我都是使用夢的機器,因為比較熟悉也比較方便,但是我也只用到他最基本「一對一合併」,因為其他的沒有用過也沒研究了,我想很多人的需求應該只是基本的檔案偽裝而已,我也把我的使用放是簡易介紹給大家,因為還是有人困惑說到底怎麼合併,那就看看我的教學吧!

檔案偽裝圖檔

好聽是說教學,其實就一張圖來說明而已啦^^,圖檔在上檔案在下,拖曳進去夢的機器的就可以了,下方可以選擇輸出的目錄和檔名,選好之後就「開始合併」,這就大功告成啦!(產生還原分割檔索引可選可不選,我通常不產生)

檔案偽裝圖檔

上面這張圖就是一個範例,一切就是這麼的簡單囉!學會了嗎?快去試試看囉!

此外補充一點,有像相簿上傳圖片後圖檔會經過壓縮,那麼你的偽裝檔案就消失囉!所以圖片若要分享給大家,還是得選擇可以保留原圖檔的一些空間!

檔案偽裝的軟體:
夢的機器V1.1
圖檔合併程式 1.2.0V - 檔案偽裝圖片的小工具

p.s.我的教學圖暗示的很明顯哩吧!LOVE
Source : http://portable.easylife.tw/1720

Link from

神器 IETester

by ○。o傻〃仔〃仔o。


IETester是来自DebugBar的一款整合了IE5.5-IE8 beta1引擎的免费浏览器,支持在独立的标签页中开启不同版本的IE,这比Multiple_IE要方便很多,并且,最重要的是,IETester在Vista下运行良好,像我这样的Vista控终于可以在测试网页时摆脱虚拟机的束缚了。

IETester仍然处于Alpha测试阶段,问题多多,不过仍然不能阻止它成为我眼中的神器~我真的等这类软件等了快两年了…

更多信息请去DebugBar 官方页面

Source : http://xuyiyang.com/2008/07/08/ietester/

Link from

富士通研發可自動刪除資料的USB隨身碟

2009年4月22日 星期三 by ○。o傻〃仔〃仔o。


這是一款內建CPU且必須安裝電池的USB隨身碟,只要超過事先設定的資料保存時間,或是插入未經授權的電腦,隨身碟均會啟動自動刪除資料的功能。


富士通週五(4/17)發表一項強化資料安全防護性的USB隨身碟樣品與相關技術,可設定自動刪除資料的時間以及指定轉存電腦等功能。

該樣品是一款內建CPU且必須安裝電池來驅動的USB隨身碟,只要超過事先設定的資料保存時間,或是插入未經授權的電腦,隨身碟均會啟動自動刪除資料的功能。舉例來說,使用者可設定超過24小時自動刪除資料,或是透過專用軟體事先設定可存取隨身碟的電腦。

另外,針對公司內部人員可能將資料列印或夾帶於電子郵件寄出的問題,富士通將獨自研發File Redirect軟體安裝在社內所有電腦後,隨身碟只要一插入社內電腦,軟體就會自動將資料轉存至指定伺服器,不會留下備份資料電腦中,也不能使用列印、郵寄等功能。

此產品近期將規劃在富士通社內運用,未來預定製成商品販售,有助於仍未引進精簡型客戶端電腦設備的企業,同時也可降低因人為因素攜出隨身碟在私人電腦上使用,被Winny等點對點檔案交換軟體散播的可能性。(編譯/張嵐霆)

Source : http://www.ithome.com.tw/itadm/article.php?c=54594

Link from

Google釋出Analytics API

by ○。o傻〃仔〃仔o。


該API為一Google資料API,與其他Google Calendar、Finance及Webmaster等工具採用同樣的API協定面。


Google於周二(4/21)釋出Analytics API。Google Analytics為免費的網頁流量分析服務,該API的釋出讓開發人員可將網頁流量分析報告匯出到各種應用程式及服務中。

Google說明,該API讓大型企業及廣告代理商可整合所屬的企業資料及流量分析資料;而開發人員則可將Google Analytics嵌入他們既有的產品中並打造用來銷售的應用程式。使用者能在開發人員打造的儀錶板與小工具中看到流量分析資料。個人與企業都能透過各種 全新的方式存取Google Analytics資料。

現階段已有許多整合Google Analytics的應用程式出爐,例如Actual Metrics針對Android平台所建置的Mobile GA,以及Desktop-Reporting所設計的多種Google Analytics桌面工具。

在企業應用上,MailChimp將Google Analytics整合在該公司的電子郵件行銷平台上,而ShufflePoint提供可將Google Analytics資料嵌入PowerPoint簡報內的服務,youcalc則提供可混搭Google Analytics、AdWords、Salesforce.com及其他企業資料的多種應用程式。

Google表示,所有Google Analytics上的資料都可透過此一流量分析資料匯出API取得,並採用唯讀設定,該API為一Google資料API,與其他Google Calendar、Finance及Webmaster等工具採用同樣的API協定,因此如果開發人員曾使用上述API,就會熟悉其介面。

現階段Google已建置JavaScript及Java程式語言的客戶端程式庫,以簡化打造相關應用程式的程序,Google亦計畫支援其他程式語言,目前使用其他程式語言的開發人員可以透過HTTP存取該API的XML格式資料。(編譯/陳曉莉)
Source : http://www.ithome.com.tw/itadm/article.php?c=54619

Link from

restaurant city - cheat rubbish [ 製作垃圾堆田區賬戶 ]

2009年4月17日 星期五 by ○。o傻〃仔〃仔o。


你可以add 這個email 試效果: toilet[at]live.hk

ENG version : CMWONG.COM
本例 search 垃圾數值為15, 你需跟住自己的垃圾數目來修改

A. 開啟cheatengine, 進入你RC 的測試帳號, 必須在這個賬戶中有垃圾

B. 進入後, 這里提供兩種方法,

B1. 如果你的用戶餐廳中有垃圾,那麼就數一數垃圾的數目,例如15,最好把所有臺凳都收起,把這個數值15 用cheat engine : first scan 15

B2. search 15 後, 去餐館清理掉 2件垃圾, 垃圾數目變13, 把15 改成13 ,next scan

B3. 重復上面的scan 方法,直至左邊欄的address 剩余 4個.

B4. 然後出街,  再入回餐館, 這時你會發現 4個address中只有一個數值是和你的垃圾數目一樣, 那麼就把這個address 加到下面

B5.  把這個address前面的小格仔選中, 後面的數值 改為999, 你的餐館就會立即充滿垃圾

B6. 由于垃圾大於餐廳位置,會不斷涌出,所以你只要開按鍵精靈狂按一個位置,就可以得錢和分

C1. 假如你的餐館沒有垃圾,  那麼就去朋友的餐館, 見到有垃圾,那麼就重復B1-B5,直至找到個address

C2. 當你改完個數值後, 幫你朋友清理完垃圾,然後出去街再入去,垃圾又會出現..

注意:

1.Restaurant city 清理垃圾後立即save是沒有效果的, 因為它采用auto update,所以必須等候數分鐘,分數和金錢才會儲存.

2.如果你想制造垃圾堆田區賬戶, 切記不能將垃圾數值設得太大, 太大的話就不能訪問,建議幾千就夠了. 而且設定後等auto save後, 這個賬戶不要再登入,如果再登入,堆田區效果就會失去, 一個堆田區用戶可以供多人訪問

3.此cheat 適用於flash player 10 or 9 版本

4. 不懂修改可以自己跟cheatengine 的tutor 學用cheatengine.

5. 幾時知save 左? 用其他瀏覽器入另一個帳戶,就可以知道堆田區是否堆田成功!

6. 可以用cheatenine 為你按鍵精靈加速…按得更加快….


Source : http://www.rockfu.net/blog/2009/04/16/restaurant-city-cheat-rubbish/

Link from

死�逃生的 MacBook Air

by ○。o傻〃仔〃仔o。


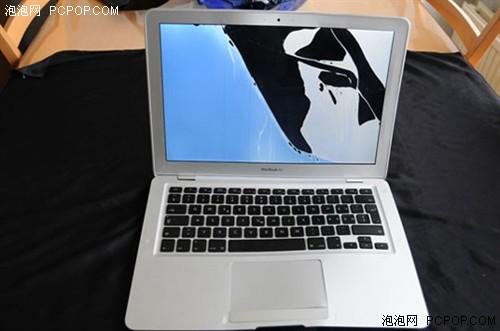
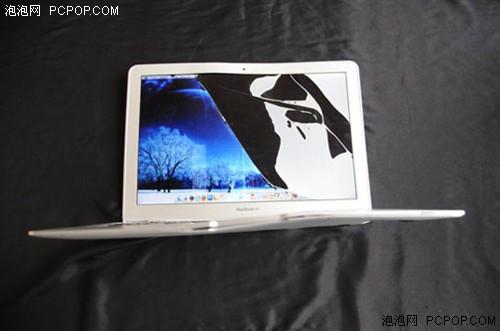
上周二发生在土耳其的坠机事件中有9人丧生,121人受伤,幸运的是,Sefer Baris便在这121人当中,并且和他一起获救的还有他的MacBook Air。

死里逃生坠机MacBookAir竟然还能用

死里逃生的MacBook Air

    当时Sefer坐在飞机比较考前的位置,座位号是7号,发生坠机事件之前,他正在用MacBook Air看电影,当飞机开始着陆的时候,他只是关上了笔记本,并没有采取什么保护措施,没几分钟灾难便来临了。

死里逃生坠机MacBookAir竟然还能用
死里逃生的MacBook Air

    Sefer的脖子受伤了,MacBook Air 1/2的液晶屏碎了,整个机身也变的扭曲,让人意想不到的是,按下开关按钮,MacBook Air竟然还能开机?!经过修理之后应该还可以使用。这要归功于MacBook Air的一体式机身设计,或许还有一部分Luck在里面,否则很难说会在这场坠机事件中粉身碎骨……

    我们在这里祝愿Sefer和他的MacBook Air“早日康复”!

Source : http://www.cnbeta.com/articles/82109.htm

Link from

Zyxel P-320W Port Forwarding (如何開放 VNC / BT 所需要的port)

2009年4月16日 星期四 by ○。o傻〃仔〃仔o。


Open a web browser like internet explorer or Netscape. Enter the ip address of your router in the address bar of your browser. In the picture above the address bar has http://www.google.com in it. Just replace all of that with the ip address of your router. By default the ip address should be set to 192.168.1.1.


You should see a box prompting you for your password. Enter your password now. By default your password is 1234. Click the Login button to log in to your router.


Click the Go to Advanced Mode link near the center of the page.


Click the Network link near the left side of the page.

You should now see a new menu. In this new menu, click NAT.


Click the Port Forwarding button near the top of the page.


Click the Modify button near the right side of the page.


Rule Setup
Active  
Service Name
Start Port
End Port
Server IP Address 192.168.1.

We will list a series of lines here that will show you exactly how to forward the ports you need to forward. VNC requires you to forward the 5500,5800,5900 ports. Go ahead and enter the settings shown above into the Rule Setup menu and then click Apply.

Rule Setup
Active  
Service Name
Start Port
End Port
Server IP Address 192.168.1.

You should see another page of settings that need to be entered into one of the blank lines on your routers Rule Setup page. Go ahead and enter those settings and then click Apply.

Rule Setup
Active  
Service Name
Start Port
End Port
Server IP Address 192.168.1.

You should see another page of settings that need to be entered into one of the blank lines on your routers Rule Setup page. Go ahead and enter those settings and then click Apply.

When you're finished, click Apply near the bottom of the screen to save your changes.

And that's it! You're done!


To test if your port has been properly forwarded, you can use our Port Checker tool.

Source : http://portforward.com/english/routers/port_forwarding/ZyXEL/P-320W/VNC.htm

Link from

Flash Telnet Tool

by ○。o傻〃仔〃仔o。


昨天發現一個超好用的小工具 flashterm_
簡單說,它就是一個 Flash AS3 做出來的 Telnet Client
可以用來連上 BBS..
最主要還是拜 AcrionScript 3.0 ByteArry 與 Socket 連線功能
這樣的工具才能誕生

在網頁上就能連上 BBS,真的太酷了!

甚至可以用來連上 Linux Telnet Server 作為遠端 Console 使用
純粹只是測試,這是不建議的作法喔!

轉載請註明出處 http://ticore.blogspot.com/2009/04/flash-telnet-tool.html

Link from

Restaurant city - new cheat (保持體力100%)

by ○。o傻〃仔〃仔o。


1:下載 安裝cheat engine
2:開cheat engine and game
3:於遊戲內set你所有人為侍應
4:於cheat內按左上條bar 的brocess 再select你開game所用既explorer
5:於cheat內 數值下空白位置打2 再按enter
6:等待左邊數據出現
7:於遊戲內set你所有人為cook
8:於cheat內 數值下空白位置打1 再按enter
9:等待左邊數據出現
10:於遊戲內set所有人為rest
11:於cheat內 數值下空白位置打3 再按enter
12:看看左邊數值是否有8個

if yes :1:把左邊8個數值全部雙鍵點擊 直至低下出現該8個數值
2:把底下 forzon的一排全部打 tick
3:完成


if no :1:於遊戲內set你所有人為cook
2:於cheat內 數值下空白位置打1 再按enter
3:等待左邊數據出現
4:於遊戲內set所有人為rest
5:於cheat內 數值下空白位置打3 再按enter
6:看看左邊數值是否有8個 再看上面if yes的step

Source : http://forum5.hkgolden.com/view.aspx?message=1663102&page=3&highlight_id=0

Link from

512GB Super Talent SSD已经发售

2009年4月9日 星期四 by ○。o傻〃仔〃仔o。


4月9日早上消息,国外媒体报道,来自Techreport的消息,Toshiba与A-data在近几个月都宣布了512GB固态磁盘,但是一直未曾开卖,而Super Telent近日宣布首款512GB SSD正式发布并且已经可以购买到。

不过售价确实惊人,此前据Super talent称售价低于1500美元,而公布的免运费价格确实是低于1500美元,售价1499.99美金(包邮),果然是低于1500美元!


产品型号为 512GB Super Talent MasterDrive RX,目前可以在superBiz网站上直购。(购买点此
Source : http://www.cnbeta.com/articles/81402.htm

Link from

超薄輕巧之12吋NetBook降臨-DELL Inspiron Mini 12使用體驗 及評測

2009年4月8日 星期三 by ○。o傻〃仔〃仔o。


還記得從2007年第一台7吋螢幕的小筆電正式登場後
2008年一開始就進入了NetBook的戰國時期
各廠紛紛以Intel Atom處理器來做為核心,並研發各式7~10吋左右的NetBook

還記得從2007年第一台7吋螢幕的小筆電正式登場後
2008年一開始就進入了NetBook的戰國時期
各廠紛紛以Intel Atom處理器來做為核心,並研發各式7~10吋左右的NetBook

以往的NB要輕巧,往往都是高貴的價格
像是商務款高階NB,11~12吋的螢幕大小、外殼質感佳、重量輕,但是價格都要1500~2000美金左右
NetBook的出現慢慢改變著此一越輕巧就要越高價的NB生態,搭配效能較一般的處理器,7~10吋的螢幕大小
重量能有效壓到1.1~1.5kg,價格方面也在300~450美金左右

DELL在Inspiron Mini 9推出廣受好評後,最近也有兩款新的NetBook面示
Inspiron Mini 10/Mini 12,其中Mini 10有著承接Mini 9的市場定位
大多數消費者比較好奇就是Mini 12,螢幕規格12吋的NetBook,葫蘆裡到底賣著什麼藥?!

首先看到DELL Inspiron Mini 12外觀
有黑色與白色版本,白色版本主要是上蓋為白色
上蓋使用鋼琴烤漆,質感很不錯,缺點是容易沾上指紋


讓小弟比較驚奇之處,本以為Mini 12是塑膠材質的外殼
實際摸底部殼時卻是金屬冰涼感,應該是類金屬材質,質感頓時加分許多


Width 29.9cm X Height 2.331cm~2.761cm X Depth 22.9cm


觸控板範圍廣,使用起來相當順手
鍵盤也使用規格較好的大尺寸版本,對於打字時不會有影響
不過在< > ?三顆按鍵是較小一點,需要花點時間來習慣


鏡面螢幕,尺寸為12.1,也是此款NetBook的最大特色
上方兩個小圓孔分別為1.3MP webcam與輔助照明燈


銀色為電源按鈕,右方孔位皆為喇叭


電源指示燈號,開啟或充電時都是亮白色燈號
電力不足時會以橘色燈號閃爍表示
鍵盤按鍵也不同於一般,按鍵使用稍微有些弧度的設計


右方IO
SD/MS/MMC插槽,支援SDHC規格
音源孔,可輸出入,外接喇叭、耳機或麥克風等配備
USB 2.0
RJ 45網路


左方IO
鑰匙孔/AC輸入/D-SUB輸出/USB 2.0
這樣Mini 12一共有三個USB可以擴充


目前在DELL網站販售的Mini 12,依規格分為幾個版本
CPU分為Z520 1.33G/Z530 1.6G
HDD分為40/60/80GB三個版本
此回的主角是CPU Z530 1.6G,HDD為SAMSUNG 80GB,最高階版本

SPUER PI 1M&CPUMARK 99


這方面的Mini 12 Z530效能結果與一般使用N270 ATOM 1.6G幾乎一樣

內建的3D繪圖晶片為Intel Integrated Graphics Media Accelerator 500
3DMARK2001SE


可惜沒有容量可以選擇,只分享到主記憶體8MB供使用
在後續的3DMARK2003或是PCMARK都無法完成VGA方面的測試

HDD為SAMSUNG 80GB 4200轉,規格為1.8吋 ZIF接頭
HD Tune PRO 3.50&CrystalDiskMark 2.2


使用1.8吋4200轉的HDD,平均效能落在27~28Mb/s
在CrystalDiskMark測試中讀取都有超過30Mb/s的水準,這方面其實效能沒有那麼不堪
只是跟市面上眾多的2.5吋產品相比,明顯少了未來升級的空間


系統效能
CrystalMark


PCMARK 2005


CPU.Memory與其他NetBook效能相同
不過3D與HDD效能,相較於其他945晶片組搭配2.5吋的HDD要來的弱
Mini 12實際運作中溫度相當低,幾乎感覺不太到熱度


電池續航力
3Cell的電池,24Wh
Battery Eater Pro V2.70(關閉無線網路與藍芽裝置)


Battery Eater Pro運作時會以跑OPENGL的狀況運作,會比一般文書使用更耗電
此狀況下得到的續航力約2小時31分
若開啟無線網路運作,搭配Battery Eater Pro測試續航力約2小時左右
實際使用無線上網的話,大約有兩個半小時左右續電力,以這樣輕薄的3Cell電池,表現稱得上優秀


採用Power Angle做為功耗數據參考
拿掉電池以AC狀況進入OS待機-10W


拿掉電池以AC狀況進入OS全速運作Super PI-13~14W


安裝AC電源補充電池電力狀況-18~19W


比起先前使用過的10吋NetBook,搭配N270+945GSE,一進入桌面待機約20~22W相對省電許多
Mini 12使用處理器為Z530搭配Intel US15W晶片組,兩款都為Mobile Internet Devices市場設計
Z530的規格與常見的NetBook N270處理器幾乎一模一樣,但Z530屬於低功耗的版本,比N270還省電約40%
Intel US15W也同樣屬於低功耗(4.3W)版本,比一般NetBook會使用的945GSE晶片組(11.3W)還省電38%左右
兩款專門對MID研發的產品,搭配起來更能發揮低溫、低耗電的效果

3個USB接孔讓擴充性比一般2個USB接孔的NetBook更佳


DELL Inspiron Laptop Mini 12總結
優點
1. 目前唯一擁有12吋螢幕的NetBook,厚度也只有23~27mm
2. 搭配3Cell電池重量只有1.24kg,比有些10吋NetBook還輕巧
3. 上蓋使用烤漆,底部使用類金屬材質,兼顧外觀與質感
4. 使用特殊規格的處理器與晶片組,機體相當安靜,溫度也只有30幾度
5. 3個USB 2.0插槽供擴充,觸控板與鍵盤設計不會太小
6. CPU與Chipest都是MID低功耗版本,相較於一般NetBook,可省下近40%的電力
7. 無風扇靜音設計,也只有搭配這樣的配備組合,才能享受到這樣低溫靜音的NetBook

缺點
1. DRAM只有內建1GB,無法擴充
2. HDD使用少見的1.8吋 ZIF,升級不方便
3. 系統執行效能還有優化的空間
4. VGA只能分享到8MB,希望BIOS增加顯示卡記憶體容量的選項可供選擇

效能比 ★★★★★★★☆☆☆
用料比 ★★★★★★★★☆☆
外觀比 ★★★★★★★★★☆
性價比 ★★★★★★★★☆☆


關於內建喇叭方面,聽起來中音雖清楚但不夠飽和,高音不會太尖銳,以這種產品來說還算及格的表現
視訊方面表現就差強人意,1.3M的畫質看起來模糊不夠清楚,這方面也還有改善空間

擴充性方面應該是此款Mini 12最令人在意的地方,不過如果以"NetBook"的需求來看
CPU 1.6G、DDR2 1GB搭配HDD 80GB在使用Net定位上應該綽綽有餘
剛開始使用Mini 12時,比較無法讓人習慣的地方就是VGA只有8MB無法更改
這個缺點若原廠有意願的話,後續應該還有機會透過BIOS更新來改善

目前MINI 12搭配Windows XP Home Edition的價位為台幣19500~20500元左右,折合美金約575~605元。
DELL提供兩年原廠保固,比較其他10吋只有一年保固的NetBook產品
市價約台幣14000~17000元,折合美金約415~500元。
DELL Inspiron Laptop Mini 12夾帶12吋螢幕的優勢下,市場價位還算不錯


當然整體看來,Mini 12還是瑕不掩瑜
外觀漂亮、質感佳、WebCam、超薄與羽量化機體、3 USB擴充孔等等優勢
加上低溫、低功耗、靜音的組合,是第一款進入12吋NetBook領域的產品
在NetBook有需求的消費者來說,如果不是追求效能或後續升級需求的話
強調主要上網、一般文書用途、輕巧好帶、12吋大螢幕為主的需求範圍,Mini 12相信是一款值得列入考慮的選擇:)

Source : http://www.mobile01.com/topicdetail.php?f=236&t=1006517

Link from

2009 新版mac mini 拆機 開箱文 (同場加影新舊比較圖)

by ○。o傻〃仔〃仔o。


As you can imagine, we were happy to see a new Mac mini get announced this morning. The Mac mini is an incredibly powerful server with a low price. Colocating with macminicolo.net allows your Mac mini to be used worldwide with stunning speed and security.

So, enough with the sales pitch. We had a call from the Apple Store first thing this morning saying they had a mini for us. (The Business Consultants there know we really like our minis.) So, here is the Mac mini unboxing and quick look inside. All the images are clickable to really, really big images. Hopefully you'll find something we missed and we can add it.

The New Packaging
The packaging for the new Mac mini is quite a bit smaller. Apple says it is 31% smaller. Below you'll see it compared to the size of the software box that Leopard comes in. They have this Mac mini box wrapped in cellophane. I've seen that done with Mac minis bought from Best Buy, but never from the Apple Store.


Also missing from the box is the handle that used to be on top. Surprisingly, without the handle the box seems a little heavier. I suppose it's because it's not as easy to hold in the hand.

Another strange thing is that the Mac mini has 10 vents on the back, but the box only shows 9 vents on the back. (Arn at Macrumors pointed this out to me.) Opening the box used to be from the top, but now it slides out from the side. You are immediately greeted with the familiar "Designed by Apple in California."


You lift this small box up with a side tab. As you'd guess, the small box contains the the Applications Install DVD , the Mac OS X Install DVD, and your documentation. The Application Install DVD let's you install Safari, Mail, Spaces, iChat and Time Machine without having to boot from the full Mac OS X DVD. This Application Install DVD wasn't given with the last Mac mini. The Mac OS X Install DVD has version 10.5.6 on it.


The Mac mini itself has very little padding on the sides. In the last package, it was surrounded by styrofoam.


Under the Mac mini is one more cardboard box to pull up. Below that is the familiar power adapter, the AC cord, and a mini-DVI to DVI adapter. This will make it much easier for people to use their existing displays since the adapter is included. I was happy to see that the power brick no longer has the sticky wrapping on it. I can't tell you how many Mac minis we've received with the wrapper halfway on still because they got tired of picking it off.


External Views
The outside of the Mac mini looks nearly identical. It has the same aluminum siding and the white plastic top. I guess I can't prove it, but having handled several hundred of the last generation Mac minis, the aluminum feels different. Perhaps it was manufactured differently. (Though I doubt it comes from a single block of aluminum.) Below is a little Mac love with the previous generation on top, and the new version on bottom.


Taking A Look Inside
I don't know hardware components as well as the guys at ifixit.com, so I'll leave the in depth disection to them. However, I've opened up so many of these Mac minis I have a good feel for what has changed.

Luckily, they can still easily be opened with a putty knife.


However, one used to have to disconnect a cable on the front right corner. That is no longer there.


The screws are on all four corners still. There are now three antennas. From what I can tell, the back right is still Airport and the front left is Bluetooth. There is an extra antenna on the back left which is a second Airport antenna.


On the last version, you just had to remove the front right power cable to remove the top section or it would disconnect as you pulled. Now, there are three cables that will disconnect if you pull straight up. Take careful note of where they detach from. Here are where all three antennas connect to the motherboard.


A full shot with the optical, the fan, and the hard drive removed. The RAM has changed orientation. (It used to be perpindicular to the front, but now it is parallel.


Three months ago, we published an article called The State of the Mac mini. In this article, we were the first the mention that the new mini would have a SATA optical drive, making it easier to have a second hard drive in it. It turns out that the optical drive is indeed SATA. (We also thought there would be a BTO option of replacing the optical drive with another hard drive, but we were wrong on that account.) Here is the info from the optical drive.


And the back of the optical drive and hard drive.


Well, those are the main parts of the new Mac mini. We're going to get right to work on benchmarking this Mac mini in server performance. The last version was solid and performed well. With the extra RAM (at a faster speed), and the larger hard drives, these Mac minis should make even better servers.

If you'd like to keep up on the benchmarks, keep up with us on twitter here. Also, if you are able to spot anything from the pictures that can be added, please send us an email or a message on Twitter.

About Macminicolo.net
Macminicolo.net, a Las Vegas colocation company, has been hosting Mac minis since their introduction in January 2005. They have become the leaders in this niche market and are known for their personal service. They currently host hundreds of Mac minis for satisfied customers located in 26 different countries around the world.


source : http://www.macminicolo.net/macmini2009.html

Link from